Vacuum Bleeding Brakes
Techniques and Best Practices
Vacuum Bleeding Brakes
Techniques
and Best Practices
What are the benefits?
- Removes air and moisture from the brake system- Vacuum bleeding is a highly efficient method of removing air and old moisture laden brake fluid from the brake lines. Air and moisture can significantly reduce the performance of your brakes, making them less effective. By using a vacuum pump to remove air and old brake fluid, you can ensure that your brake system functions optimally, giving you better control over your vehicle.
- Saves time and effort- It is a quick and efficient process that saves time and effort. Unlike other methods that require you to manually pump the brakes with two people, vacuum bleeding brakes allows you to complete the process in a matter of minutes with one person. This means that you can get back on the road faster and spend less time worrying about your vehicle's brakes.
- Prevents brake failure- Regular bleeding of brakes can prevent brake failure or loss of pressure. When air and moisture are present in the brake fluid, they can cause corrosion and damage the brake components. This can lead to brake failure, which can be dangerous and costly to repair. Vacuum bleeding regularly can help prevent this from happening, ensuring that your brakes are always in good working order.
- Improves brake performance- By removing air and moisture from the brake lines, you can significantly improve the performance of your brakes. This means that your brakes will be more responsive, allowing you to stop your vehicle more quickly and effectively. Improved brake performance increases your safety on the road, as it can help you avoid accidents and collisions.
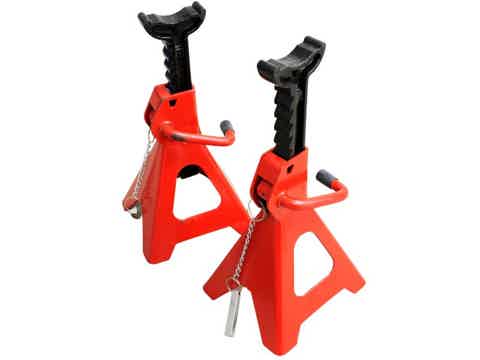
Jack and jack stands: To access the brake calipers, you'll need to jack up the car and put it on jack stands. This is so you can remove the wheels for easy access the caliper bleeder screw.
Clean rags or towels: You'll also need clean rags or towels to wipe off any dirt or grease that may have accumulated around the brake caliper. You can also place a piece of cardboard under the brake caliper to soak up any drips.
- Removes air and moisture from the brake system- Vacuum bleeding brakes is a highly efficient method of removing air and old moisture laden brake fluid from the brake lines. Air and moisture can significantly reduce the performance of your brakes, making them less effective. When you bleed brakes with vacuum pump to remove air and old brake fluid, you can ensure that your brake system functions optimally, giving you better control over your vehicle.
- Saves time and effort- It is a quick and efficient process that saves time and effort. Unlike other methods that require you to manually pump the brakes with two people, it allows you to complete the process in a matter of minutes with one person. This means that you can get back on the road faster and spend less time worrying about your vehicle's brakes.
- Prevents brake failure- Regular vacuum bleeding of brakes can prevent brake failure or loss of pressure. When air and moisture are present in the brake fluid, they can cause corrosion and damage the brake components. This can lead to brake failure, which can be dangerous and costly to repair. Bleeding brakes regularly can help prevent this from happening, ensuring that your brakes are always in good working order.
- Improves brake performance- Removing air and moisture from the brake lines can significantly improve the performance of your brakes. This means that your brakes will be more responsive, allowing you to stop your vehicle more quickly and effectively. Improved brake performance increases your safety on the road, as it can help you avoid accidents and collisions.
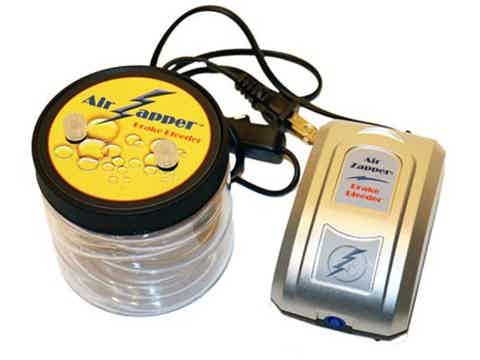
When it comes to using a vacuum pump for bleeding brakes, there are several techniques and best practices that you should follow to ensure a successful and effective process. Firstly, it is important to choose the right vacuum pump for your vehicle's brake system. The vacuum pump should have enough suction power to pull fluid from the brake reservoir back to the brake caliper that if furthest away. Additionally, a vacuum brake bleeder should be easy to use and maintain.
Another important best practice is to use the correct bleeding sequence. This involves starting with the brake caliper furthest from the master cylinder and working your way towards the closest one. This ensures that all the air and moisture is removed from the brake lines, preventing any potential issues or failures.
By following the best practices and bleeding techniques outlined above, you can enjoy the numerous benefits, including improved brake performance, increased safety, and a longer lifespan for your brake components.
How often should it be performed?
Are there any precautions to consider?
- Firstly, it is essential to wear protective eyewear and gloves. This is because brake fluid is highly corrosive and can cause severe eye and skin damage if it comes into contact with them.
- Secondly, ensure that the brake fluid reservoir is filled to the recommended level before beginning the vacuum bleeding process and check it regularly during the bleed to ensure it does not run dry. This prevents air from entering the system from one end while you are removing air from the other and causing further problems.
4. Fourthly, we recommend removing the bleeder screw and applying from Teflon tape to the threads (taking care not to cover the bleed hole) and replace the bleeder screw. This will prevent air from being drawn around the bleeder screw which can give a false indication of air in the brake lines when vacuum is applied.
How often should it be performed?
Are there any precautions to consider?
- Firstly, it is essential to wear protective eyewear and gloves. This is because brake fluid is highly corrosive and can cause severe eye and skin damage if it comes into contact with them.
- Secondly, ensure that the brake fluid reservoir is filled to the recommended level before beginning the vacuum bleeding process and check it regularly during the bleed to ensure it does not run dry. This prevents air from entering the system from one end while you are removing air from the other and causing further problems.
- Thirdly, it is essential to have a proper vacuum bleeder and vacuum hoses that are in good condition. Worn or damaged hoses can cause the brake fluid to leak , leading to an ineffective bleed.
- Fourthly, we recommend removing the bleeder screw and applying from Teflon tape to the threads (taking care not to cover the bleed hole) and replace the bleeder screw. This will prevent air from being drawn around the bleeder screw which can give a false indication of air in the brake lines.
- Finally, it is crucial to follow the manufacturer's instructions. Improper use of the vacuum pump can cause damage to the brake system, leading to costly repairs and potential safety hazards.
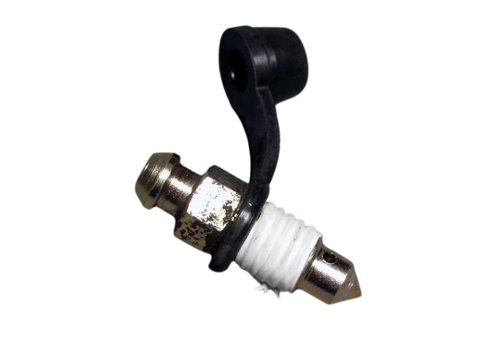
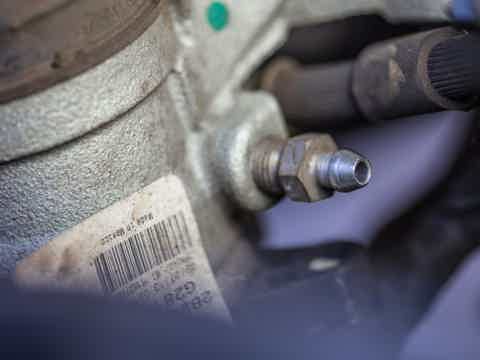
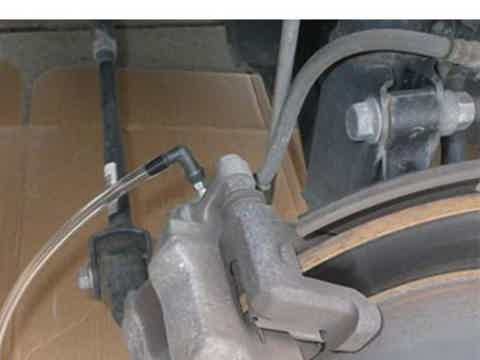
- Locate the brake bleeder screw on the caliper furthest from the vehicle brake fluid reservoir. The first step is to locate the brake bleeder screw, usually located at the caliper or the wheel cylinder. If you're not sure, refer to your vehicle's manual.
4. Start the vacuum source- If you are using a manual vacuum pump, simply pump, or if you are using an electric vacuum pump turn it on.
5. Remove all fluid- Continue running the vacuum source until all fluid if removed from the brake line as indicated by all air coming from the bleeder screw.
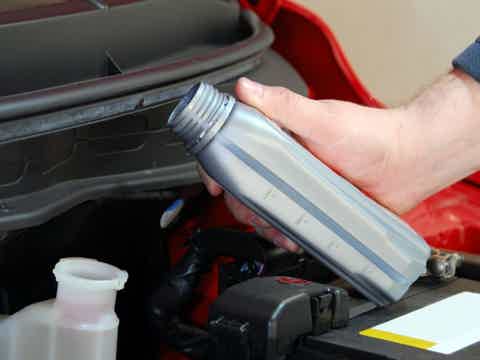
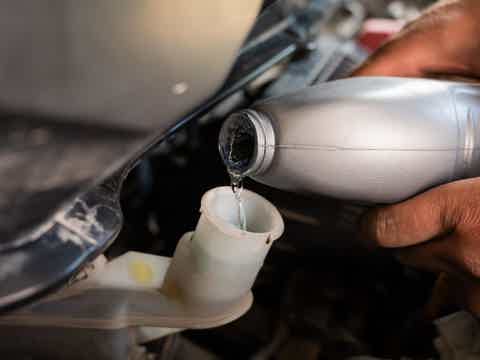
6. Fill the vehicle brake fluid reservoir- Remove the lid and fill the brake fluid reservoir with fresh brake fluid to the max level line. Be sure to use the recommended type of brake fluid for your car.
8. Remove all air from the brake line- Continue bleeding until a solid column of fresh fluid is observed in the plastic tubing with no bubbles. Note: Keep an eye on the fluid level in the vehicle brake fluid reservoir and top up as necessary to avoid introducing more air into the system
9. Close the bleeder screw- With the vacuum still applied, close the bleeder screw and disconnect the brake bleeder from the bleeder screw. Stop the vacuum source by stopping manually pumping or turning the pump off. Wipe up any spilled brake fluid.
10. Repeat steps 1-3 and 6-9 for the remaining calipers beginning with the on the next furthest from the vehicle brake fluid reservoir. Note that fresh fluid will be indicated by a color change from dark to light.
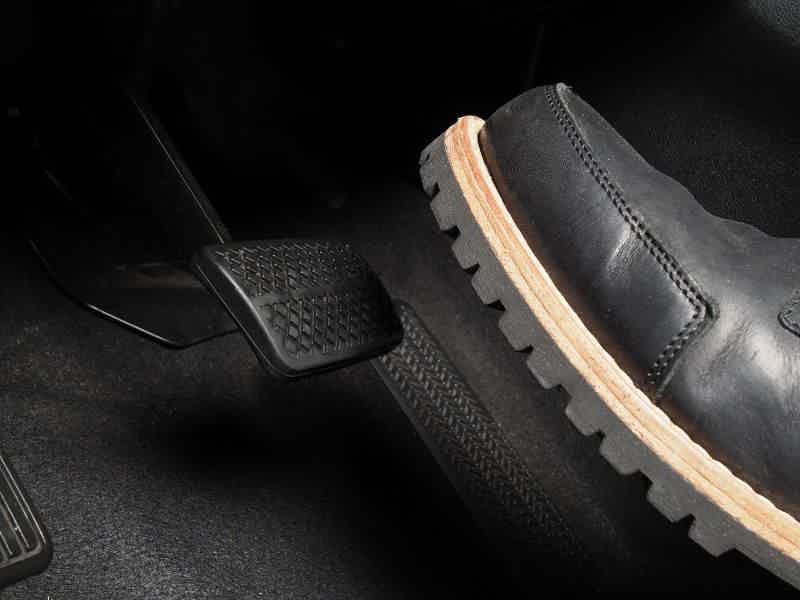
11. Once you've bled all the calipers, tighten the bleeder screws and check the brake pedal for proper feel and response.

What are the steps required?
- Locate the brake bleeder screw on the caliper furthest from the vehicle brake fluid reservoir. The first step is to locate the brake bleeder screw, usually located at the caliper or the wheel cylinder. If you're not sure, refer to your vehicle's manual.
What are the steps for required?
- Locate the brake bleeder screw on the caliper furthest from the vehicle brake fluid reservoir. The first step is to locate the brake bleeder screw, usually located at the caliper or the wheel cylinder. If you're not sure, refer to your vehicle's manual.
4. Start the vacuum source- If you are using a manual vacuum pump, simply pump, or if you are using an electric vacuum pump turn it on.
5. Remove all fluid- Continue running the vacuum source until all fluid if removed from the brake line as indicated by all air coming from the bleeder screw.
6. Fill the vehicle brake fluid reservoir- Remove the lid and fill the brake fluid reservoir with fresh brake fluid to the max level line. Be sure to use the recommended type of brake fluid for your car.
8. Remove all air from the brake line- Continue bleeding until a solid column of fresh fluid is observed in the plastic tubing with no bubbles. Note: Keep an eye on the fluid level in the vehicle brake fluid reservoir and top up as necessary to avoid introducing more air into the system
9. Close the bleeder screw- With the vacuum still applied, close the bleeder screw and disconnect the brake bleeder from the bleeder screw. Stop the vacuum source by stopping manually pumping or turning the pump off. Wipe up any spilled brake fluid.
10. Repeat steps 1-3 and 6-9 for the remaining calipers beginning with the on the next furthest from the vehicle brake fluid reservoir. Note that fresh fluid will be indicated by a color change from dark to light.
11. Once you've bled all the calipers, tighten the bleeder screws and check the brake pedal for proper feel and response.
Watch the vacuum bleeding demo and see. It's simple to bleed your brakes or completely change the fluid out the fluid! The hands-free operation allows you to refill the reservoir without stopping the bleed. Remove air from your brake system after you replace pads or do a complete fluid change. Click below to see how to bleed brakes with a vacuum pump.


What are the benefits?
- Removes air and moisture from the brake system- Vacuum bleeding is a highly efficient method of removing air and old moisture laden brake fluid from the brake lines. Air and moisture can significantly reduce the performance of your brakes, making them less effective. By using a vacuum pump to remove air and old brake fluid, you can ensure that your brake system functions optimally, giving you better control over your vehicle.
- Saves time and effort- It is a quick and efficient process that saves time and effort. Unlike other methods that require you to manually pump the brakes with two people, vacuum bleeding brakes allows you to complete the process in a matter of minutes with one person. This means that you can get back on the road faster and spend less time worrying about your vehicle's brakes.
- Prevents brake failure- Regular bleeding of brakes can prevent brake failure or loss of pressure. When air and moisture are present in the brake fluid, they can cause corrosion and damage the brake components. This can lead to brake failure, which can be dangerous and costly to repair. Vacuum bleeding regularly can help prevent this from happening, ensuring that your brakes are always in good working order.
- Improves brake performance- By removing air and moisture from the brake lines, you can significantly improve the performance of your brakes. This means that your brakes will be more responsive, allowing you to stop your vehicle more quickly and effectively. Improved brake performance increases your safety on the road, as it can help you avoid accidents and collisions.
Jack and jack stands: To access the brake calipers, you'll need to jack up the car and put it on jack stands. This is so you can remove the wheels for easy access the caliper bleeder screw.
Clean rags or towels: You'll also need clean rags or towels to wipe off any dirt or grease that may have accumulated around the brake caliper. You can also place a piece of cardboard under the brake caliper to soak up any drips.
- Removes air and moisture from the brake system- Vacuum bleeding brakes is a highly efficient method of removing air and old moisture laden brake fluid from the brake lines. Air and moisture can significantly reduce the performance of your brakes, making them less effective. When you bleed brakes with vacuum pump to remove air and old brake fluid, you can ensure that your brake system functions optimally, giving you better control over your vehicle.
- Saves time and effort- It is a quick and efficient process that saves time and effort. Unlike other methods that require you to manually pump the brakes with two people, it allows you to complete the process in a matter of minutes with one person. This means that you can get back on the road faster and spend less time worrying about your vehicle's brakes.
- Prevents brake failure- Regular vacuum bleeding of brakes can prevent brake failure or loss of pressure. When air and moisture are present in the brake fluid, they can cause corrosion and damage the brake components. This can lead to brake failure, which can be dangerous and costly to repair. Bleeding brakes regularly can help prevent this from happening, ensuring that your brakes are always in good working order.
- Improves brake performance- Removing air and moisture from the brake lines can significantly improve the performance of your brakes. This means that your brakes will be more responsive, allowing you to stop your vehicle more quickly and effectively. Improved brake performance increases your safety on the road, as it can help you avoid accidents and collisions.
When it comes to vacuum bleeding your brakes, there are several techniques and best practices that you should follow to ensure a successful and effective process. Firstly, it is important to choose the right vacuum pump for your vehicle's brake system. The vacuum pump should have enough suction power to pull fluid from the brake reservoir back to the brake caliper that if furthest away. Additionally, a vacuum brake bleeder should be easy to use and maintain.
Another important best practice is to use the correct bleeding sequence. This involves starting with the brake caliper furthest from the master cylinder and working your way towards the closest one. This ensures that all the air and moisture is removed from the brake lines, preventing any potential issues or failures.
By following the best practices and bleeding techniques outlined above, you can enjoy the numerous benefits, including improved brake performance, increased safety, and a longer lifespan for your brake components.
How often should it be performed?
Are there any precautions to consider?
- Firstly, it is essential to wear protective eyewear and gloves. This is because brake fluid is highly corrosive and can cause severe eye and skin damage if it comes into contact with them.
- Secondly, ensure that the brake fluid reservoir is filled to the recommended level before beginning the vacuum bleeding process and check it regularly during the bleed to ensure it does not run dry. This prevents air from entering the system from one end while you are removing air from the other and causing further problems.
4. Fourthly, we recommend removing the bleeder screw and applying from Teflon tape to the threads (taking care not to cover the bleed hole) and replace the bleeder screw. This will prevent air from being drawn around the bleeder screw which can give a false indication of air in the brake lines when vacuum is applied.
How often should it be performed?
Are there any precautions to consider?
- Firstly, it is essential to wear protective eyewear and gloves. This is because brake fluid is highly corrosive and can cause severe eye and skin damage if it comes into contact with them.
- Secondly, ensure that the brake fluid reservoir is filled to the recommended level before beginning the vacuum bleeding process and check it regularly during the bleed to ensure it does not run dry. This prevents air from entering the system from one end while you are removing air from the other and causing further problems.
- Thirdly, it is essential to have a proper vacuum pump and vacuum hoses that are in good condition. Worn or damaged hoses can cause the brake fluid to leak , leading to an ineffective bleed.
- Fourthly, we recommend removing the bleeder screw and applying from Teflon tape to the threads (taking care not to cover the bleed hole) and replace the bleeder screw. This will prevent air from being drawn around the bleeder screw which can give a false indication of air in the brake lines.
- Finally, it is crucial to follow the manufacturer's instructions. Improper use of the vacuum pump can cause damage to the brake system, leading to costly repairs and potential safety hazards.
- Locate the brake bleeder screw on the caliper furthest from the vehicle brake fluid reservoir. The first step is to locate the brake bleeder screw, usually located at the caliper or the wheel cylinder. If you're not sure, refer to your vehicle's manual.
4. Start the vacuum source- If you are using a manual vacuum pump, simply pump, or if you are using an electric vacuum pump turn it on.
5. Remove all fluid- Continue running the vacuum source until all fluid if removed from the brake line as indicated by all air coming from the bleeder screw.
6. Fill the vehicle brake fluid reservoir- Remove the lid and fill the brake fluid reservoir with fresh brake fluid to the max level line. Be sure to use the recommended type of brake fluid for your car.
8. Remove all air from the brake line- Continue bleeding until a solid column of fresh fluid is observed in the plastic tubing with no bubbles. Note: Keep an eye on the fluid level in the vehicle brake fluid reservoir and top up as necessary to avoid introducing more air into the system
9. Close the bleeder screw- With the vacuum still applied, close the bleeder screw and disconnect the brake bleeder from the bleeder screw. Stop the vacuum source by stopping manually pumping or turning the pump off. Wipe up any spilled brake fluid.
10. Repeat steps 1-3 and 6-9 for the remaining calipers beginning with the on the next furthest from the vehicle brake fluid reservoir. Note that fresh fluid will be indicated by a color change from dark to light.
11. Once you've bled all the calipers, tighten the bleeder screws and check the brake pedal for proper feel and response.
What are the steps required?
- Locate the brake bleeder screw on the caliper furthest from the vehicle brake fluid reservoir. The first step is to locate the brake bleeder screw, usually located at the caliper or the wheel cylinder. If you're not sure, refer to your vehicle's manual.
What are the steps for required?
- Locate the brake bleeder screw on the caliper furthest from the vehicle brake fluid reservoir. The first step is to locate the brake bleeder screw, usually located at the caliper or the wheel cylinder. If you're not sure, refer to your vehicle's manual.
4. Start the vacuum source- If you are using a manual vacuum pump, simply pump, or if you are using an electric vacuum pump turn it on.
5. Remove all fluid- Continue running the vacuum source until all fluid if removed from the brake line as indicated by all air coming from the bleeder screw.
6. Fill the vehicle brake fluid reservoir- Remove the lid and fill the brake fluid reservoir with fresh brake fluid to the max level line. Be sure to use the recommended type of brake fluid for your car.
8. Remove all air from the brake line- Continue bleeding until a solid column of fresh fluid is observed in the plastic tubing with no bubbles. Note: Keep an eye on the fluid level in the vehicle brake fluid reservoir and top up as necessary to avoid introducing more air into the system
9. Close the bleeder screw- With the vacuum still applied, close the bleeder screw and disconnect the brake bleeder from the bleeder screw. Stop the vacuum source by stopping manually pumping or turning the pump off. Wipe up any spilled brake fluid.
10. Repeat steps 1-3 and 6-9 for the remaining calipers beginning with the on the next furthest from the vehicle brake fluid reservoir. Note that fresh fluid will be indicated by a color change from dark to light.
11. Once you've bled all the calipers, tighten the bleeder screws and check the brake pedal for proper feel and response.
Watch the vacuum bleeding demo and see. It's simple to bleed your brakes or completely change the fluid out the fluid! The hands-free operation allows you to refill the reservoir without stopping the bleed. Remove air from your brake system after you replace pads or do a complete fluid change. Click below to see how to bleed brakes with a vacuum pump.